Nov 18, 2011

Complete Denture

It's been a while without writing in my blog, I've been busy with classes but here is my new post. 

What is a complete Denture? is a prosthetic device that replace all the missing teeth and supported by soft and hard tissues. How do we do this denture?

First we have to take measures with alginate and zinquenolic.So we obtain thte models in plaster. Then we have to take the measure of the Fox plante to obtain the inclination of the mouth plus the intermaxilar measure with the facial arch. After all the measures we mount in the articulator with the deasirable measures. Second, with optosil, a yellow silicone or another kind of material, we take the Vertical Dimension of the patient, the height that we want. 


Once we finish with this, we prepare the occlusion rim for the next preparation. 


Final work before flasking:


Nov 6, 2011

Endodontic procedures 1


There is some steps to do in a endodoncy. 
  1. Open the chamber with the abrasion drills and with endo-Z drill we. Find the direct access to the apical foramen with the drills. 
  2. Expansion of the cavity to adjust for the posterior obturation. 
  3. With SX we have to wear the dentine triangle, then it will be easier for the apical curvature. This step is optional.
  4. Use the apical localization to find it.
  5. Then we start with the limes of conformation:
    1. S1 + irrigation + passenger lime
    2. S2 + irrigation + passenger lime 
  6. In the next picture we see the passenger lime that we have to pass in almost every step.
  7. After this lines we pass the limes of finishing:
    1. F1 + irrigation + passenger lime
    2. F2 + irrigation + passenger lime
    3. F3 + irrigation + passenger lime


Each lime has a different apical diameter that makes the apice bigger. Then we also have the Profile System.
The next picture is the apice localizator, there is a lot of kind of localizator. What we have to know is that they indicate you the length of the conduct. 


Protaper tecnique: 


Manual tecnique, befor Protaper: 


Oct 23, 2011

Analysis of the orthodontic models


This week we did the analysis of the orthodontic models. So I took some pictures and here is the case. The first case is a young patient that just is around 6 years old.

1. Dentition analysis:

In the frontal view we can see the 4 superior incisors permanents. As we marked in the paper he has all the permanent incisors and the 4 first molars. If we take a look at the other pictures we will see that he has no 55, 2nd molar temporal, and the 83, temporal canine. We also appreciate a rotation of the 1rst molars.            
And now we are going to talk about the upper and lower jaw. This paper is were we transmit all our results that we found that I'll explain. 


2. Arches analysis:

Upper jaw: points to talk about:

  • Form and symmetry: it can be U, UV or V. In this case the upper jaw is UV.
  • Sagittal analysis: on the right side of the patient we see the first permanent molar that is mesially and the other, the 1rst temporal molar and the canine are distally. That is may due to the absence of the 2nd temporal molar, so the other teeth tried to get the space. That's a reason of the space maintainer. When we loose a teeth and the other teeth is not ready yet, is very important a space maintainer.
  • Transversal analysis: we trace the medium line and we observe if there is a side of the mouth that is more compressed than the other, here for example we see that the right side of the patient is more compressed than the left one.    


 Lower jaw: points to talk about:

  • Form and symmetry: is a U form. 
  • Sagittal analysis: the right side of the patient is mesially respect to the other side due to the absence of the canine.
  • Transversal analysis: in this case the transversal analysis seems good.
  • Vertical analysis: is referred to curve of Spee. Like is the occlusal plan you are not able to observe that but we can say that is a normal curve of Spee. 
3. Occlusion analysis:


Right side of the patient:

  • Sagittal analysis: are able to see the MOLAR Class II and the CANINE Class III. The INCISOR relation is more difficult because there is a mesial overjet but also a distal edge to edge. 
  • Transversal analysis: in the right side we can see a posterior crossbite that needs to be corrected by a palate expander
  • Vertical analysis: This patient also has a 4-5mm anterior open-bite.      


Right side of the patient:


  • Sagittal analysis: e are able to see the MOLAR Class I so that means that is normal and the CANINE Class can't be valorated because there isn't the canine. There is the same INCISOR relation.
  • Transversal analysis: in this side there is no crossbite. 
  • Vertical analysis: 4-5mm anterior open-bite.

4. Discrepancy analysis of bone-dental
 About that we are going to talk next week.


Oct 12, 2011

The smile

After to study the facial characteristics, now we're going to see the smile. The smile is very important for our life. That's why I want to become a dentist, for those people that doesn't want to smile because they think that their smile is not pretty. 

When we smile, we have to see 100% of the central incisors and 2 or 3mm of gums. If we see more than 3mm of gums we say that this person has a high smile and if is the opposite we say this person has a low smile.
In this case, Jennifer Garner had a lips surgery. She decided to augment her lips and she decreased her smile. Her smile was high and now looks normal.
In this other case, Daniel Radcliffe, we can see a low smile. His lips are also thin but we can observe his inferior teeth. 
After to see the height we are going to see the width. In my case, like we can observe the black triangles (in green) we say that I have a narrow smile.
Then we also observe the rotations, for example in my case, the lateral incisors are a little bit rotated. 
Finally we see in pink that the smile is close the my lips form, that is called consonant. 


That's all for the moment. I hope you like it.

Oct 1, 2011

Chamber aperture

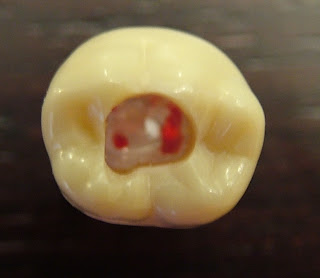
Last day at class we learned how to do the first step in a Endodoncy: the chamber's aperture. What is this? is the endodontic access. The principal objective is to remove the roof of the pulp chamber, find the root canals, give a good form and establish the functional angulation for the preparation of the canals. 

Each teeth has a different anatomy and that's why every teeth has a particular aperture. For the practice, the university starts with fake teeth like this:

  • The first theeth is the CENTRAL INCISOR:
    • 100% of them have just a only canal
    • a young teeth has 3 pulp horns
    • we have to give a triangular form


  • The second theeth is the PREMOLAR:
    • the first superior premolar has 2 canals
    • the first inferior premolar and the seconds premolars have 1 canal. 
    • 2 pulp horns
    • we have to prepare the form like an oval. 

  • The third teeth is the FIRST SUPERIOR MOLAR:
    • It has 4 canals and 4 pulp horns
    • The form is trapezoidal 
    • We have to see the 4 canals.


  • The forth teeth is the FIRST INFERIOR MOLAR:
    • It has 3, 4 or 5 canals and 4 pulp horns
    • the form is also trapezoidal or rhomboidal 


I hope you like it.